Quick GuideTo use LR/Mogrify you need to export some images.
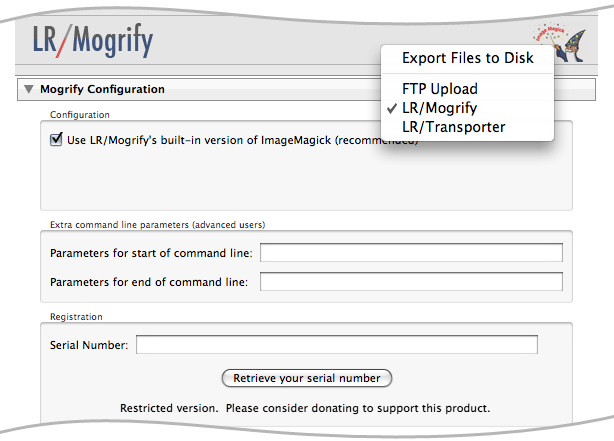
This will reveal a number of new 'panels', the first of which is the Mogrify Configuration panel where you can enter your registration code if you've donated towards the project. PC users should use this panel to specify the location of the mogrify application that was installed by ImageMagick (Mac users don't need to do this). Advanced users may also enter their own command line parameters which will be passed to the underlying mogrify application. Lightroom standard panelsAll of Lightoom's standard panels are available. It's important to bear in mind that Lightroom will first export the photo using these settings, and then Mogrify will be called to act apon the exported photo using the settings that you define in the panels below.  LR/Mogrify image processing optionsYou may choose to resize your images using Mogrify. In comparison to Lightroom's standard resize options this will allow you to choose between a number of advanced resizing algorithms to suit your taste. You can also resize to a given total number of pixels regardless of aspect ratio, which is useful for stock photographers who have to supply images with a certain number of pixels. Bear in mind that this will resize the image exported from Lighroom. To avoid resizing artifacts you should therefore you should resize using either Lightroom or Mogrify, but not both. You can also sharpen your images from here. The sharpening is applied after the resize operation. Finally, the ability to adjust the brightness and saturation of the image on export will appeal to those who like to adjust their images for typical web viewing on uncalibrated monitors. 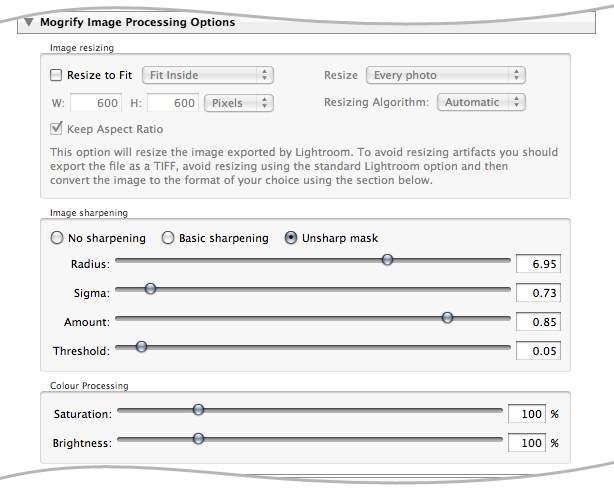 LR/Mogrify format conversion optionsMogrify can be used to convert your images to another format. This option is most useful when resizing and exporting JPEGs. To avoid artifacts caused by resizing a JPEG compressed image, the image should be exported as a TIFF from Lightroom, then resized using Mogrify and finally converted to a JPEG from this panel. Colourspace conversion is also possible. You'll need to browse to the ICC profile concerned. If you know that the image will be used by a non-colour managed system then you may choose to remove the profile in order to reduce the image size (the conversion can still be applied before this is done). If you don't understand enough about colour management to know if you should be doing this, then I recommend that you leave the profiles intact. 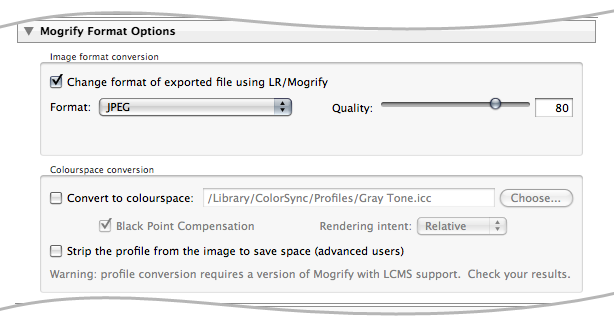 LR/Mogrify border optionsAdding up to five borders around your images is now made easy using this panel. If you only specify the pixel width (and not the height) then the border will have the same dimensions all round the image.  LR/Mogrify watermarking and text annotationsYou can easily add watermarks and textual annotations to your images. The text may be broken up onto several lines, and may include references to the photo's metadata. Simply click "Add metadata token" to add the token to the end of you text. 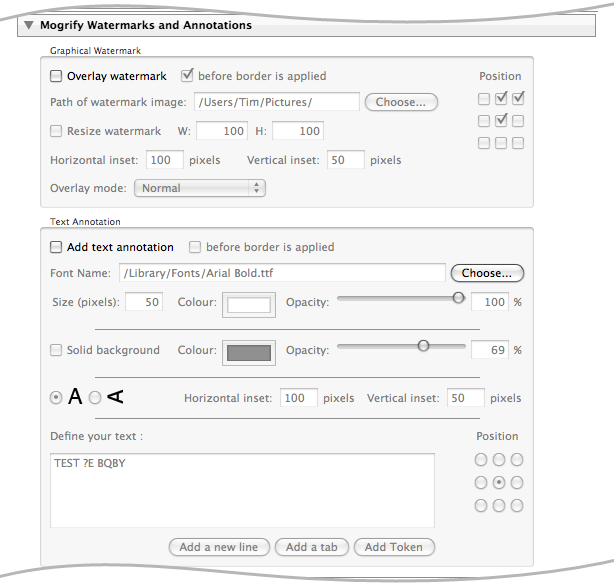 Here's an example. The image was exported as a 400x400 pixel TIFF directly from Lightroom, then a pre-prepared PNG file of my logo was used as a watermark, having first been resized to 300x116 pixels. Note that in this case the PNG file is 50% transparent, so "Normal" mode was used. A 2x2 pixel white border was added followed by a 13x12% brown border. Finally, the image was converted to a JPEG at 50% quality. 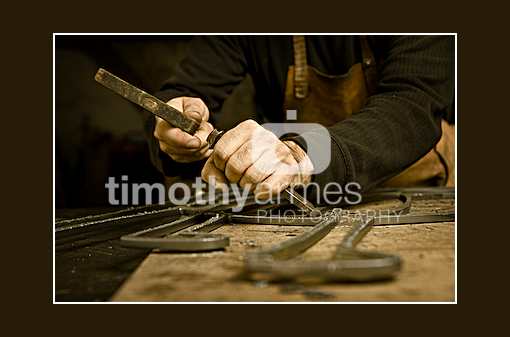 Another example. The image was again exported as a 400x400 pixel TIFF directly from Lightroom. A 3x3 pixel black border was added followed by a 20x0 white border. The 20 pixels added to each side leaves room for some text. Note that the height of 0 must be specified - simply leaving the height field blank will result in a 20 pixel border all the way round. This text annotation was added: "photo by Timothy Armes, {shutterSpeed} at {aperture}", and placed vertically at the bottom right, 12 pixels high in Times New Roman Italic, light grey, inset by 0 pixels. The option to apply the annotation before the border is applied was switch off, since I wanted to place the annotation within the border itself. Finally, the image was converted to a JPEG at 70% quality. 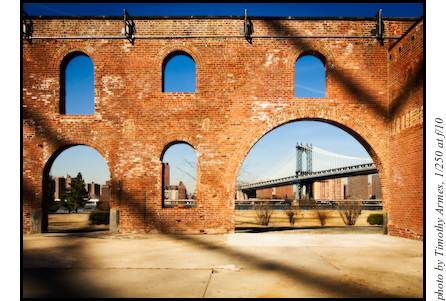 FTPFinally, to allow users to automate their entire workflow, the LR/Mogrify plugin is able to upload the exported files directly to an FTP server. 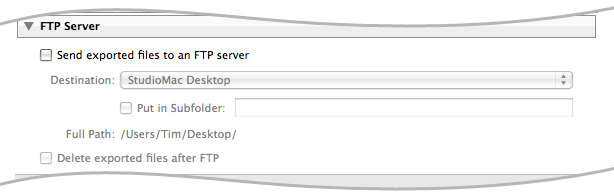 |